Brands represent the top-level organizations in your moderation hierarchy. This section covers all aspects of brand management, from creation and configuration to ongoing maintenance and optimization. Effective brand management ensures consistent moderation policies and streamlined operations across all your operators.
#Brand Overview
Each brand serves as a container for multiple operators and represents a distinct business entity within your organization. Brands allow you to:
- Organize operators by business units, regions, or product lines
- Apply consistent moderation policies across related operators
- Manage user access at the organizational level
- Configure default settings that cascade to all operators
#Creating a New Brand

Navigate to the Dashboard tab from the main navigation. Ensure you have Supervisor permissions to create brands.

Click the "Add new brand" button (blue button with plus icon) in the top-right corner. This option is only available if you have appropriate permissions.

Fill in the brand information:
- Brand Name: Use a clear, descriptive name that identifies the business entity
Click "Create" to save the brand.

The new brand will appear in your brands list on the Dashboard. The brand card will show the creation date and current status.
#Brand Configuration Settings
Access brand settings by clicking the settings/gear icon next to any brand on the Dashboard. Brand settings are organized into several key areas:

#Details Tab
Configure basic brand information:
- Brand Name: Update the display name
- Status: Enable or disable the entire brand
- Description: Add organizational notes or context
#Messages Configuration
Set default message policies for all operators under this brand:
- Message Retention Time: How long messages are stored (in days)
- Maximum Message Length: Character limit for user messages
- Message Rate Limits: Frequency restrictions for posting
#Reactions Management
Configure emoji and reaction settings:
- Unicode Reactions: Standard emoji support
- Custom Reactions: Upload custom reaction images with URLs
- Reaction Ordering: Drag and drop to arrange reaction display order

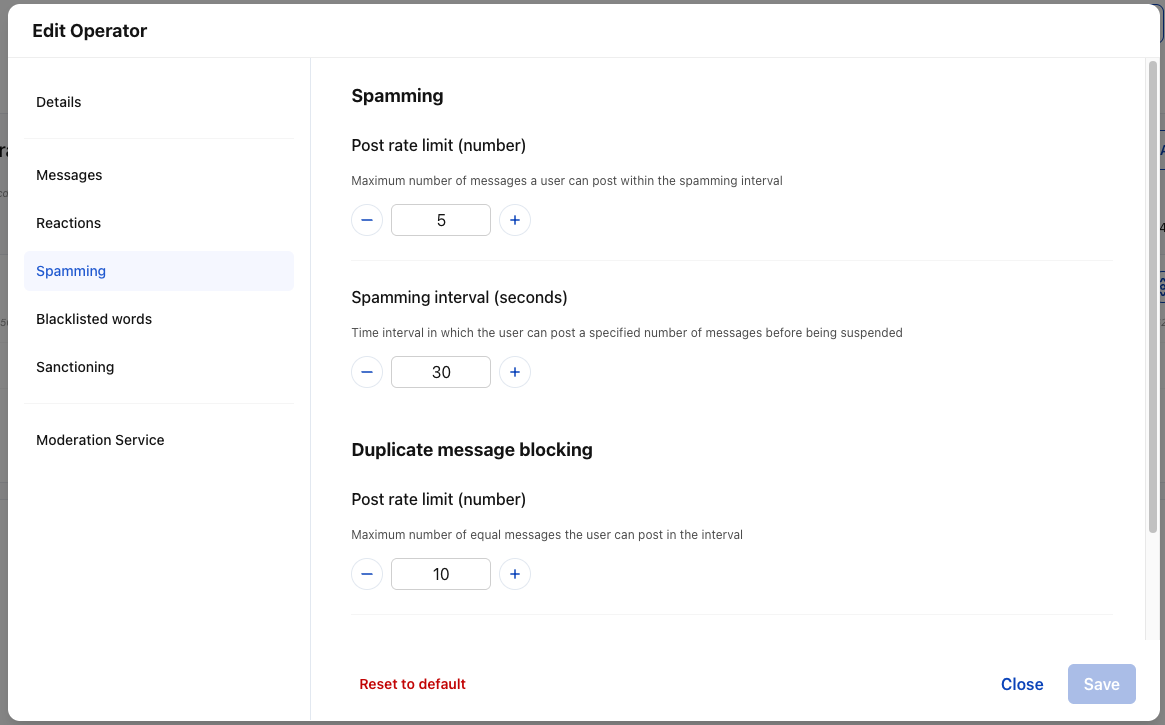
#Spam Detection
Establish anti-spam policies:
- Post Rate Limit: Maximum messages per time interval
- Spamming Interval: Time window for rate limiting (in seconds)
- Automated Actions: What happens when spam is detected
#Blacklisted Words
Manage prohibited content at the brand level:
- Bulk Import: Upload CSV files with forbidden terms
- Manual Entry: Add words individually or in comma-separated lists
- Export: Download current blacklist as CSV
- Search: Find specific terms in large lists

Managing Blacklisted Words:
- Use the input field to add single words or comma-separated lists
- Import CSV files for bulk additions (one word per row)
- Delete individual words using the X icon
- Use "Delete All" for complete list clearing
- Search functionality helps locate specific terms
- Remember to click "Save Changes" to persist modifications
#Sanctioning Policies
Define user penalty structures:
- Base Suspension Length: Default penalty duration (in seconds)
- Offense Score Decay: How quickly user violations expire
- Progressive Penalties: Escalating consequences for repeat offenders

#Brand-Level User Management
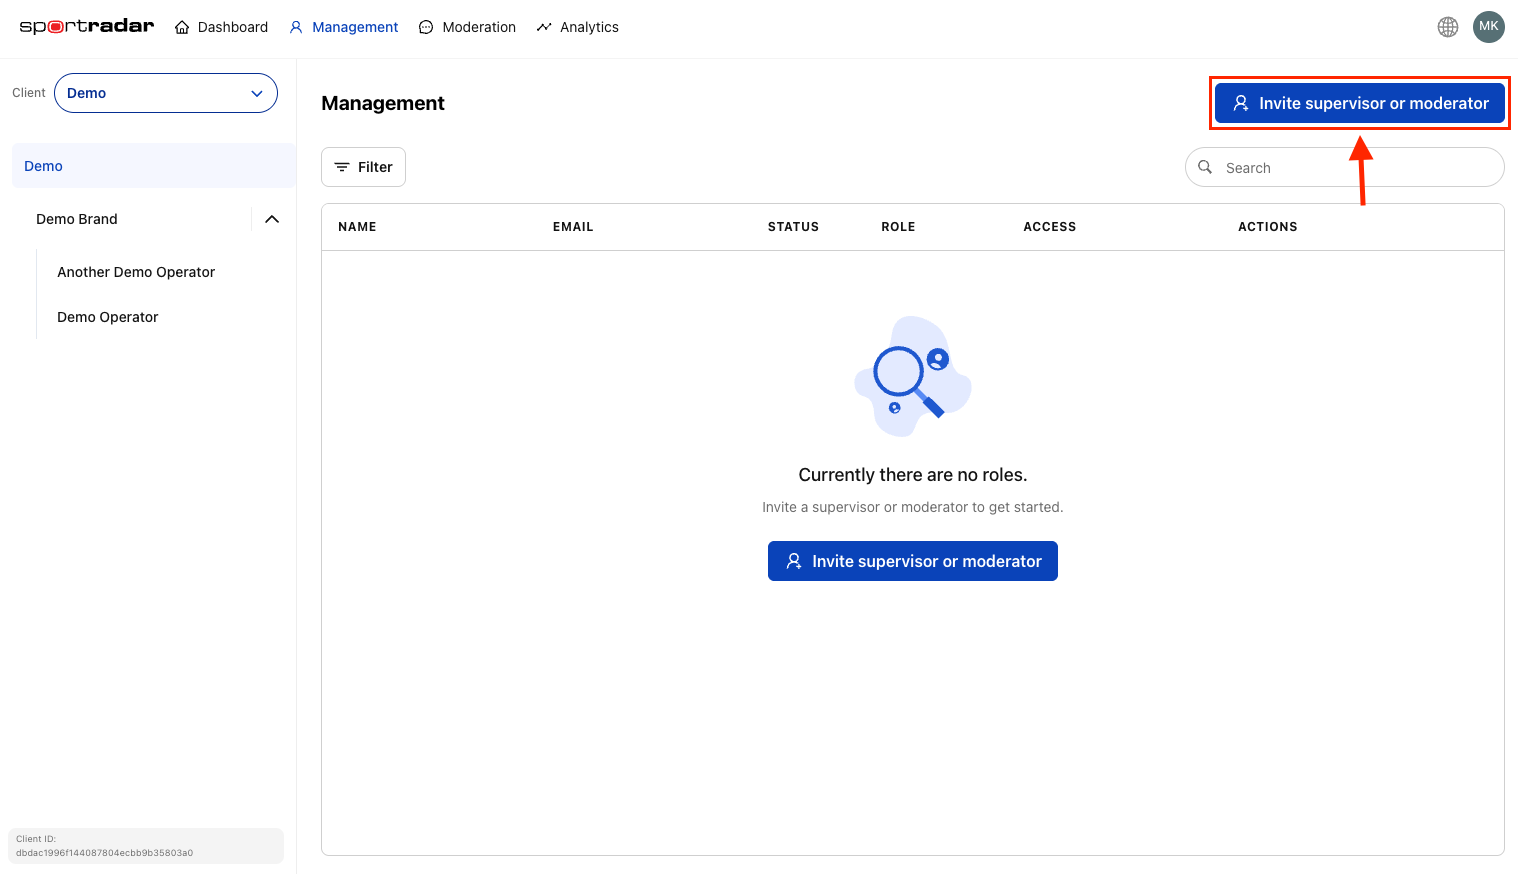
#Inviting Brand Supervisors
Brand supervisors have full access to all operators within the brand:
The Management section provides a centralized location for inviting new users across your entire organization.
Supervisors can:
- Manage all operators under the brand
- Configure brand-level settings
- Invite additional users
- Access all moderation tools
For more on supervisor and moderator roles management, see Managing supervisors and moderators page.
#Managing Brand Access
- View Active Users: See all supervisors assigned to the brand
- Modify Permissions: Change user roles or remove access
- Audit Access: Track who has access to brand resources
#Cascading Configuration Effects
Understanding how brand settings cascade to operators is crucial:
Brand-level settings serve as defaults for all operators:
- New operators inherit brand configuration automatically
- Existing operators use brand settings unless specifically overridden
- Changes to brand settings can affect all child operators
- Always test changes in a staging environment before applying to production
#Configuration Hierarchy
#Impact Assessment
Before making brand-level changes:
- Review Active Operators: Check how many operators will be affected
- Identify Overrides: Note which operators have custom settings
- Plan Communication: Inform relevant teams about upcoming changes
- Schedule Updates: Implement changes during low-traffic periods
#Brand Lifecycle Management
#Brand Activation
When enabling a new brand:
#Configure Core Settings
Set up default moderation policies.
#Create Initial Operators
Add at least one operator for testing.
#Invite Team Members
Add supervisors and initial moderators.
#Test Integration
Verify API connectivity and functionality.
#Monitor Performance
#Ongoing Maintenance
Regular brand management tasks:
- Policy Reviews: Quarterly assessment of moderation effectiveness
- User Access Audits: Monthly review of brand supervisor access
- Performance Analysis: Regular monitoring of operator performance
- Setting Optimization: Adjust policies based on user behavior and feedback
#Brand Deactivation
When disabling a brand:
Disabling a brand affects:
- All operators under the brand become inactive
- All channels stop accepting new messages
- All users lose access to brand resources
- API integrations stop functioning
Deactivation Process:
#Notify Stakeholders
Inform all relevant teams.
#Export Data
Backup important analytics and logs.
#Communicate Downtime
Notify end users if applicable.
#Disable Brand
Change status to 'Disabled'.
#Monitor Impact
#Best Practices
#Naming Conventions
- Use descriptive, consistent naming patterns
- Include region or business unit indicators
- Avoid special characters that might cause integration issues
- Maintain naming documentation for team reference
#Configuration Strategy
- Start Conservative: Begin with restrictive settings and gradually relax
- Document Changes: Maintain records of all configuration modifications
- Test Thoroughly: Use staging environments before production changes
- Monitor Impact: Track metrics after configuration changes
#Access Management
- Principle of Least Privilege: Grant minimum necessary access
- Regular Reviews: Audit user permissions quarterly
- Clear Documentation: Maintain records of who has access and why
- Prompt Updates: Remove access immediately when users change roles
#Performance Optimization
- Monitor Metrics: Track message volume, moderation accuracy, user satisfaction
- Adjust Policies: Update settings based on performance data
- Scale Resources: Add operators or adjust settings as user base grows
- Stay Updated: Keep current with new moderation features and capabilities
#Troubleshooting Common Issues
#Brand Creation Problems
- Permission Errors: Ensure you have Supervisor role
- Duplicate Names: Brand names must be unique within your organization
- Validation Failures: Check all required fields are completed
#Configuration Issues
- Setting Conflicts: Verify operator overrides aren't causing unexpected behavior
- Cascade Problems: Test changes on a single operator before applying brand-wide
- Performance Impact: Monitor system performance after major configuration changes
#Access Problems
- User Invitation Failures: Verify email addresses are correct and deliverable
- Permission Mismatches: Ensure users have appropriate roles for their responsibilities
- Integration Issues: Check API keys and endpoint configurations
After setting up your brand, proceed to add operators, configure API keys, and invite team members to complete your moderation setup.